In this article we would like to share with you a step-by-step guide to optimize your WordPress installation.
Remember that WordPress has a lot of excellent plugins and themes that will facilitate the creation of your website and, at the same time, will provide you with a complete page, with the necessary functions for you and your users.
However, it is important to keep in mind that in its installation process can be saturated and this is not fully optimized, which will harm the performance of your WordPress site.
In this guide, we will tell you about some free add-ons and give you some recommendations so you can optimize your site.
Remember that in this guide we will only talk about optimization problems and solutions for "front-end".
Note: If after following the step-by-step and the advice we will give you in this guide, your site still has performance problems, you should check your hosting or code optimization. "back-end.
Now, let's go to the step by step optimization...
STEP BY STEP:
- Test your website with GTmetrix:
Before performing any optimization, test your page on GTmetrix.com to let you know how your website is doing and have a performance benchmark.
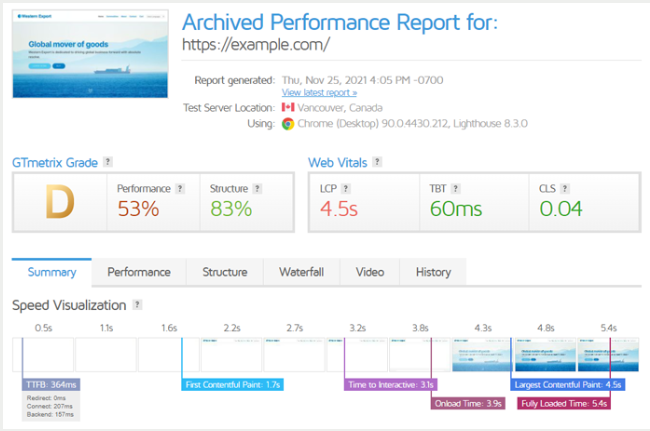
We recommend that you log in or create an account (it's free) so you can analyze your site with GTmetrix.comThis way you will be able to monitor and track your site's performance on a daily basis.
Also we recommend that you re-analyze your page in GTmetrix.com after you perform each step optimization so that you can see which elements have improved the performance of your page or, on the contrary, which steps are likely to make things worse.
- Make a backup copy:
It is essential that you make a backup copy of your WordPress installation before optimization.
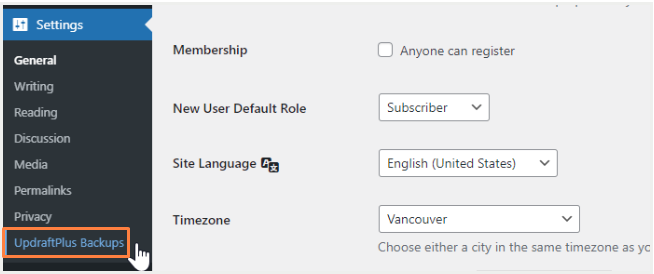
You can use any of the WordPress plugins to make the backup. In this guide we will show you how to use UpdraftPlus to make your backup, this includes database, plugins, themes, uploads, among others.
Follow the instructions to activate UpdraftPlus:
- Download UpdraftPlus: In the "Plugins" section of your WordPress search for UpdraftPlus, download it, then install it and activate the plugin.
- WordPress backup: Now that UpdraftPlus is installed and activated, you can start backing up your WordPress installation.
- Open the UpdraftPlus settings: In the "Settings" section in the WordPress sidebar, you will have access to a new menu option called "UpdraftPlus backups". Click on this option to open the plugin settings.
- Click on the "Backup now" option: A window will appear, in this window you must make sure that the options "Include your database in the backup." e "Include your files in the backup." are selected.
- Remove unwanted or unused plug-ins:
It is common that, over time, you have installed many plugins on your WordPress website. It may be that some of these you have only used for a short period of time and no longer need them; that's why, it is important that you review them and delete the ones you no longer use.
Disabling plugins is one of the best ways to optimize the performance of your WordPress site. However, you should keep in mind that, in some cases, simply disabling your plugins is not enough.
Therefore, the recommended practice is to completely remove unwanted add-ons if you no longer need them.
Also we recommend you to update all your plug-insThe new version may contain performance enhancements and/or security fixes, among other improvements.
- Optimize Images:
Image optimization is an important and, in many cases, high-impact task in WordPress optimization, as it helps with efficient image coding review and reduces overall page size.
There are many options for WordPress image optimization plugins, but in this article we will tell you about Smush, as the most popular plug-in for image optimization.
Follow the instructions to optimize your images using Smush:
- Download SmushNOTE: The procedure to do this is the same as with the other plug-ins.
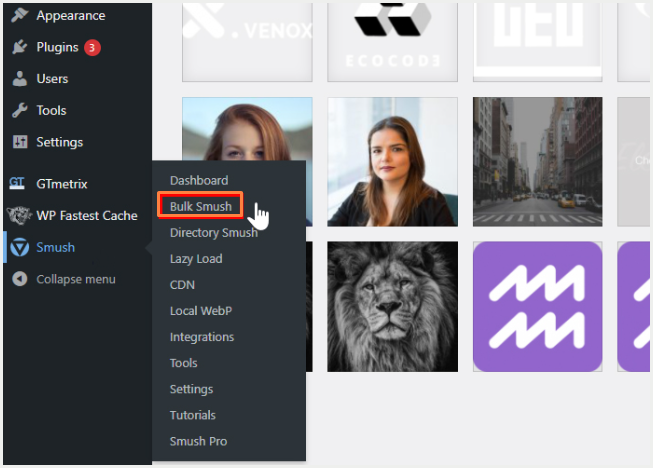
- Once you have activated the plug-in, you will have access to a new menu option called "Smush".
- Open Bulk Smush settings: Hover the cursor over the menu item Smush and you will see a list of submenu options; click on "Bulk Smush.
- Go to the bottom and enable the following settings:
Image size
Select all the images in the library to optimize them, including those generated by WordPress.
If you want to optimize certain sizes select "Custom".
Automatic compression
Enable "Automatically compress my images when uploading",
This ensures that any new image is automatically optimized.
Metadata
Enable the "Remove metadata from my image" option to remove additional data that has been stored for your images, such as camera settings, color profile, EXIF data, etc.
Do not enable this option if the images depend on color profiles to display in their preferred colors.
Remember to click "Save changes" when you are done.
- Click on "Bulk Smush Now".
Please note that the free version is limited to optimizing groups of 50 attachments at a time. If you have more than 50 images to be deleted, you will have to repeat the above steps.
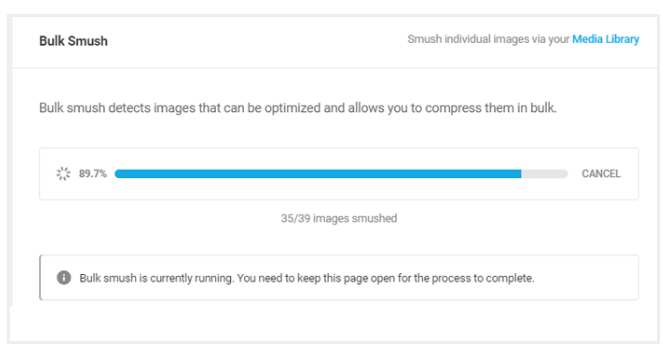
Note: Be sure not to leave this section until the task has been completed.
- Cache:
With caching, your website will provide already generated data (i.e. cached content) to visitors, instead of generating data for each visit.
This improves page download time and reduces server/back-end time, improving TTFB and other performance metrics.
For best results, if you have a mission-critical WordPress installation and are looking for a next-level caching solution, we recommend "WP Rocket".
Important notice! We recommend that at this point you analyze your page and, if caching and image optimization generate sufficient performance, you can stop and continue with Step 8.
If you find that it still lacks performance, you can continue to implement the following steps. But keep in mind that you should do these steps with caution as they may interfere with the performance and functionality of your website. If you are not an expert in this subject we recommend the support of a developer.
- Load scripts:
As you add plugins to your WordPress installation, the plugin scripts are added to the global header of your page, which means they are loaded on every page.
Then, every time a visitor loads your page, all plug-in scripts are also loaded.. The more plugins the more scripts your website will have, which can have a major impact on your performance.
To improve the performance of your page you can make sure that only the scripts that are really needed are loaded.
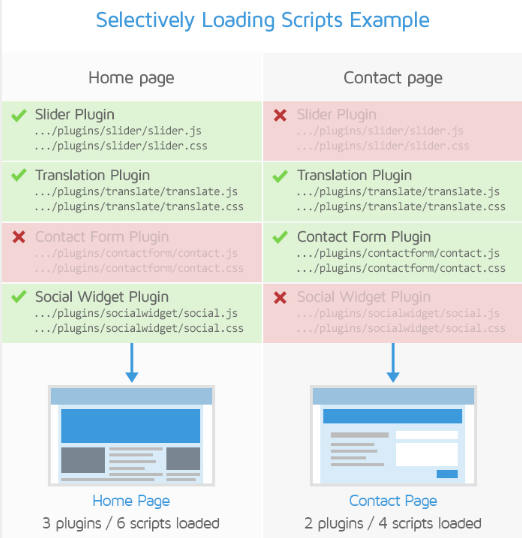
You can use the plugin Asset Cleanup that will allow you to identify and eliminate unnecessary requests of specific pages so that your page can load faster.
Follow the instructions if you want to use Asset Cleanup.
- Download Asset Cleanup:
NOTE: The procedure to do this is the same as with the other plug-ins.
- Open the CSS and JS Manager settings, a list of CSS/JS requests from various plugins, themes and other third party services being loaded on your site will appear.
- Note that it starts with requests that are loaded on the home page, which is the default option (check that the home page is selected at the top of the settings).
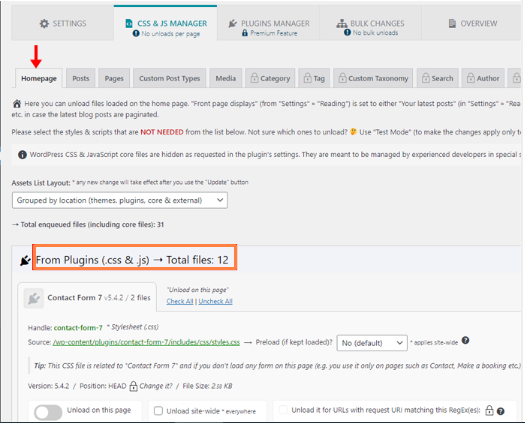
- Identifies and downloads requests that are not needed for the home page. One way to identify if a file is not needed is to look at what plugin is requesting the file and see what the file name is.
- Clear your page cache and load your home page by browsing as incognito so you can test the design and functionality.
If you see any problems, revert the scripts you downloaded, you have to do it one by one.
- Once you have completed the home page, you can do the same on the following pages. Type keywords in the filter bar (e.g. About, Contact, etc.) and click on the page you want to clean.
You should now be able to see a list of CSS/JS requests for that particular page. Identify and remove the requests that are not needed on this page.
- Remember to repeat this step as you see fit on each page of your website, and double CHECK that everything is working properly!
- Optimize the server:
Web performance is a combination of performance "back-end" y "front-end".
Most of the optimizations you have done up to this point are related to add-ons to improve the front-end structure; therefore, it is important that you make sure that on the hosting side things are also running efficiently.
In addition to choosing a more powerful host and optimizing your code, you should also "back-end", there are a few things you can do as a WordPress user to improve the performance of your site:
- Preload the InterpreterBy default, PHP loads and parses each application script every time a request is made to the server.
Preloading the interpreter involves loading libraries and frameworks into the cache before executing any application code. In some cases, this can result in a significant improvement in server processing time.
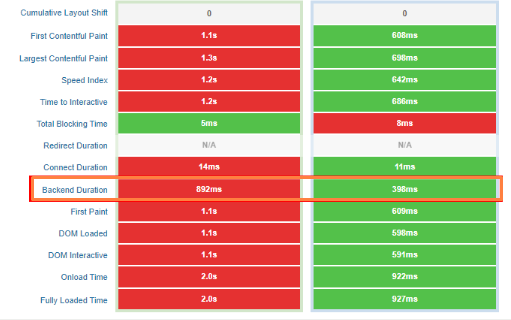
- In the example above, preloading the PHP scripts resulted in a 55 % improvement in the duration of the "back-end"This will speed up all other times and result in faster page loading overall.
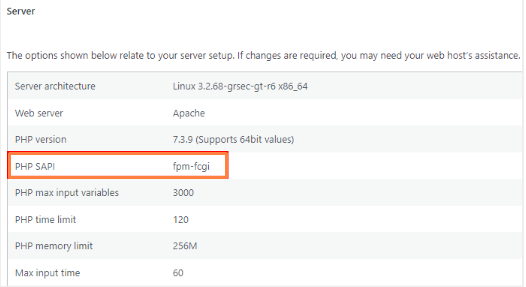
- One way to preload PHP scripts is by using PHP-FPM (FastCGI Process Manager). In WordPress, you can check if your server interface already uses PHP-FPM by hovering over "Tools" in the WordPress sidebar and clicking on "Site Health".
- Next, you must click on "Information" and navigate to the "Server" submenu. If you are using PHP-FPM, the PHP SAPI field should show fpm-fcgi.
- To enable PHP-FPM you must enable it on the server side. You can do this through your hosting administration panel (e.g. cPanel) or you may need to contact your hosting provider's technical support to help you enable it.
Please note that PHP-FPM may not be available for all hosting services. This is especially true for low-cost hosting plans.
- PHP version upgradeIt is important to make sure that you are running the latest version of PHP for your hosting configuration. Upgrading your PHP version can help you gain some performance and security benefits, as well as access to new WordPress features.
If you want to check your PHP version (you will need administrator rights), hover over "Tools" in the WordPress sidebar and click on "Site Health".
- Analyze your page again:
When you have finished doing the above steps, you can re-analyze your web page at GTmetrix.com) and check its performance.
You should see improvements in the following metrics:
- Grade GTmetrix.com
- Performance/structure scores
- First painting with content
- Painting with larger content
- Time for Interactive
- Speed index
- Number of applications
You should also see improvements in the following audits:
- Elimination of resources blocking rendering
- CSS/JavaScript Minimization
- Reduction of unused CSS/JavaScript
- Efficient image coding
- Text compression
- Static asset service with efficient cache policy
WordPress has many plugins that will allow you to easily create your website with all the necessary functions, as well as help you optimize performance so that your users have a good experience in navigating your page..
The optimization plug-ins discussed in this guide are a good option to improve performance and are compatible with most websites.
If you have a WordPressTry this guide and improve your web experience for all your visitors.
If you have trouble with any of the steps, remember that in ClickPanda we have 24/7 technical support, contact and we will be happy to help you make your website a better place.
If you want to know more about WordPress we invite you to read the following articles from our Blog: